> ## Documentation Index
> Fetch the complete documentation index at: https://invopop-singapore.mintlify.site/llms.txt
> Use this file to discover all available pages before exploring further.
# Workflows Guide
> Configure a workflow in Invopop to process documents.
## What is a Workflow?
A workflow in Invopop is a sequence of steps executed for each incoming job. Each step is powered by the provider of a service. Examples of services include:
* Generating PDFs
* Forwarding invoices to tax agencies
* Modifying documents
* Sending emails
* Posting webhooks
* Sending documents to ERPs or other systems
Workflows automate and streamline your document and invoicing processes. Invopop ensures each step is executed reliably, with built-in retries and error handling. The steps are executed sequentially (the next step will only execute until after the previous one has completed) so you don't need to handle asynchronous responses.
## Anatomy of a Workflow
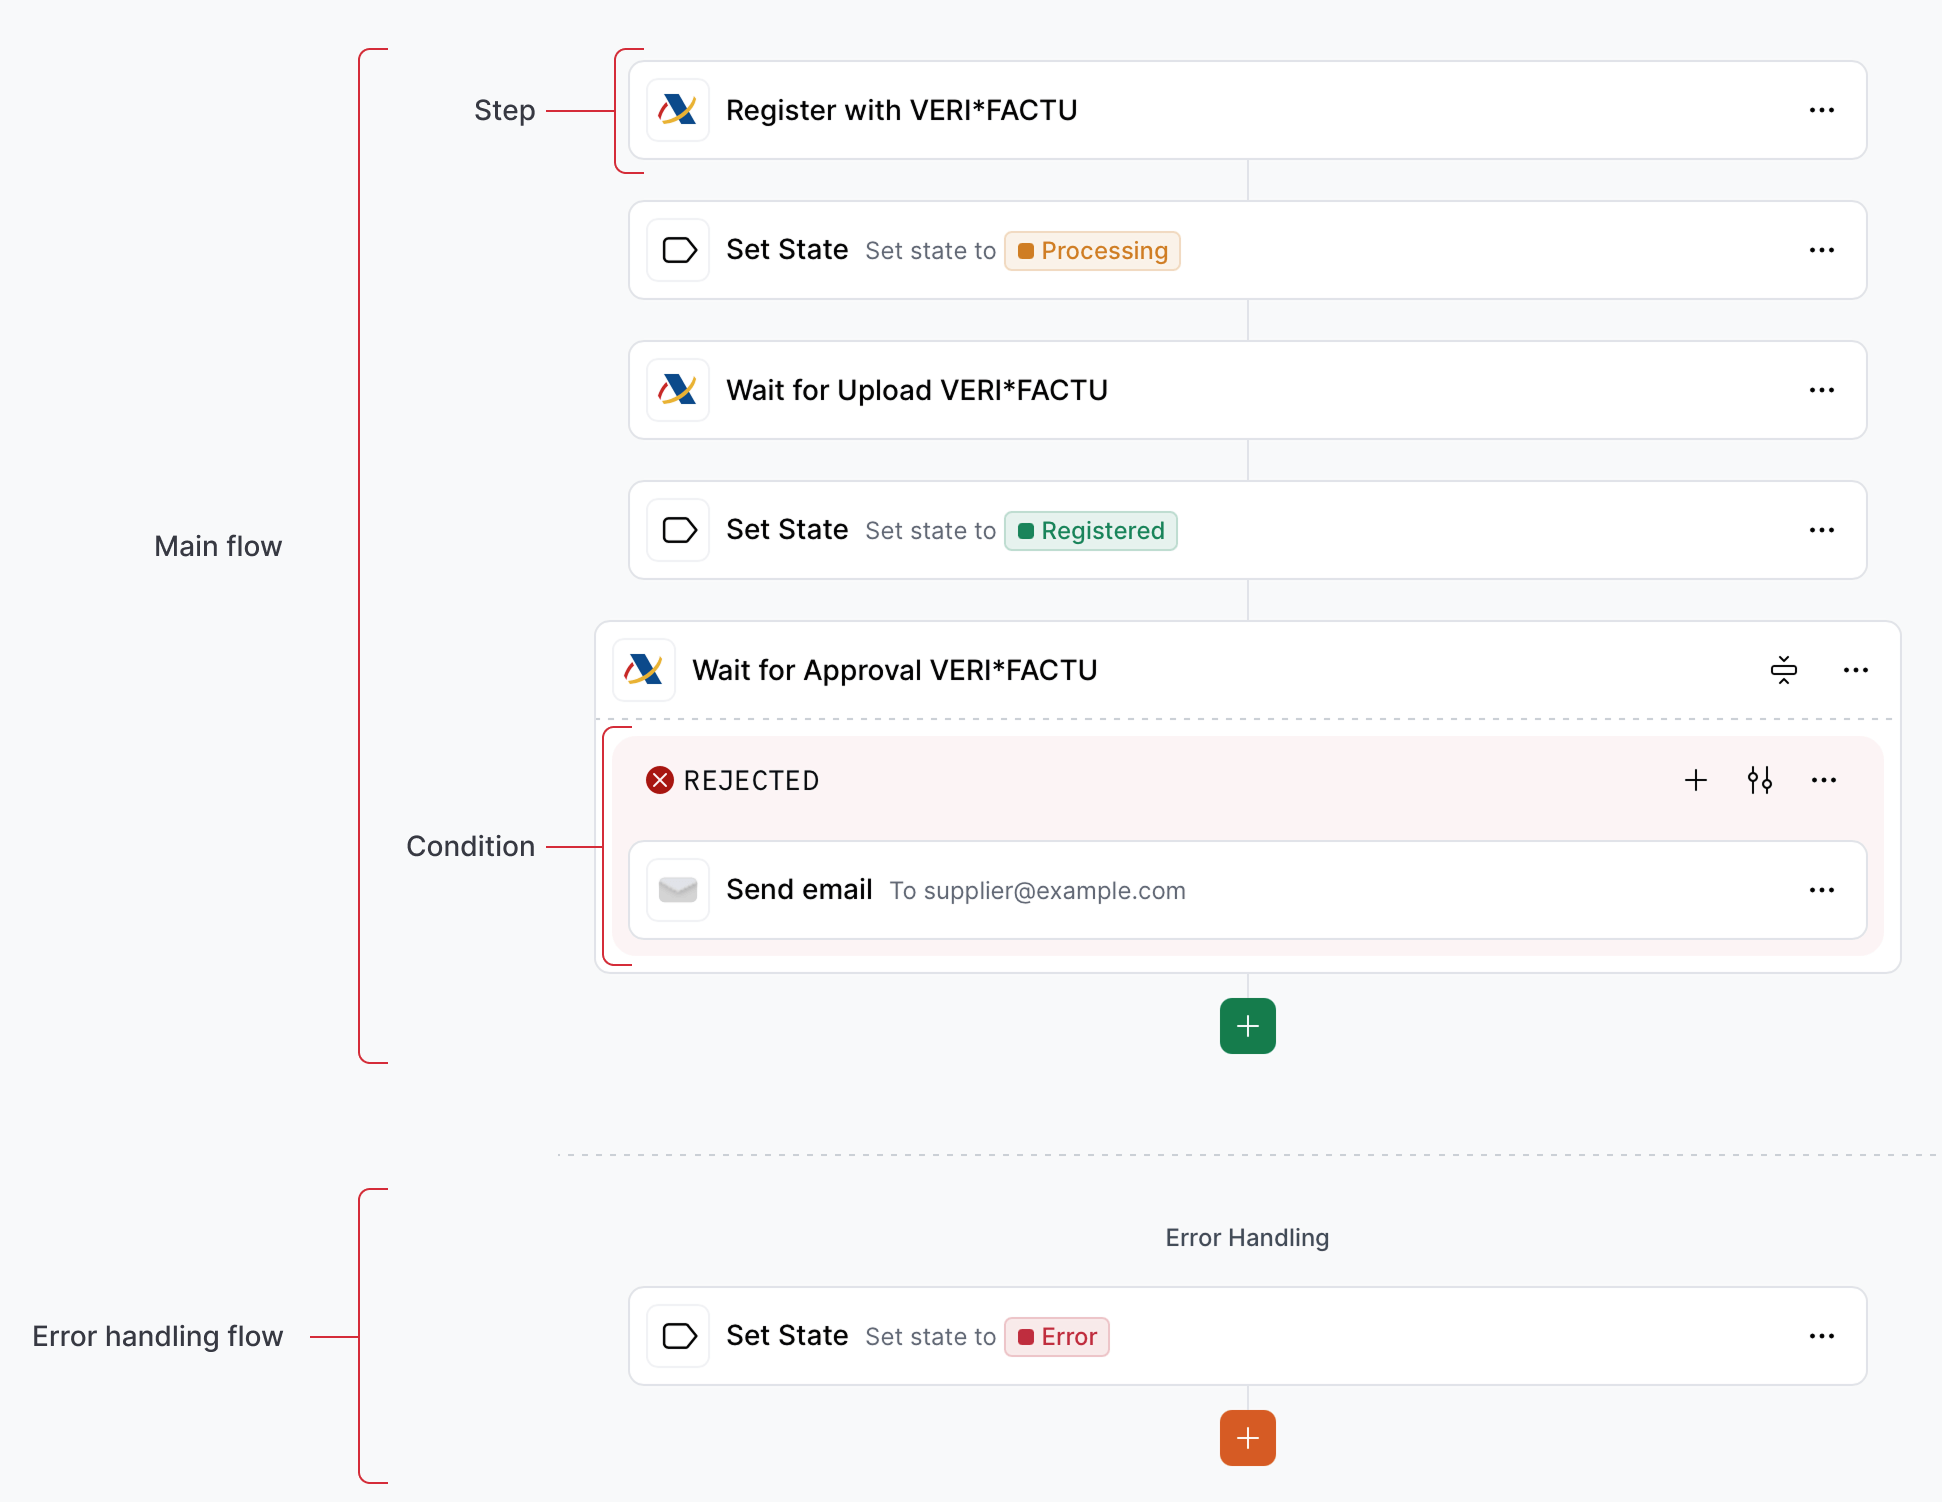 A workflow is composed of two main areas:
* **Main flow:** defines the standard sequence of steps that the workflow follows under normal conditions. It represents the intended execution path, showing how tasks progress when the steps execute correctly (`OK`) and when exceptions or errors are handled within conditions.
* **Error handling flow** defines the sequence of steps when an unhandled error or exception occurs. It allows you to specify alternative actions, recovery logic, or notifications to ensure the process can handle unexpected conditions gracefully. Keep in mind the error handling flow is executed if a step does not handle its own error through a condition.
Both flows are composed by *steps* which can contain *conditions*.
* **Steps** are action performed with the entry being processed, such as sending the document to a tax authority, generating a PDF, or sending a notification to the customer or issuer.
* **Conditions** determine the logic that directs how a workflow proceeds. They evaluate the *status* and *code* outcome of a given step, and if there's a match, it will execute the steps contained within that condition. If the status of a condition is `KO`, the *error handling flow* won't be executed as this would be a *handled error*.
## How to create a Workflow
Although workflows can be created via the API, we strongly recommend using the [Invopop Console](https://console.invopop.com) for an easier set up.
In the **Workflows** section click on **+ Create workflow**. You will see a template selection screen. The first two items are blank workflows for each document type:
A workflow is composed of two main areas:
* **Main flow:** defines the standard sequence of steps that the workflow follows under normal conditions. It represents the intended execution path, showing how tasks progress when the steps execute correctly (`OK`) and when exceptions or errors are handled within conditions.
* **Error handling flow** defines the sequence of steps when an unhandled error or exception occurs. It allows you to specify alternative actions, recovery logic, or notifications to ensure the process can handle unexpected conditions gracefully. Keep in mind the error handling flow is executed if a step does not handle its own error through a condition.
Both flows are composed by *steps* which can contain *conditions*.
* **Steps** are action performed with the entry being processed, such as sending the document to a tax authority, generating a PDF, or sending a notification to the customer or issuer.
* **Conditions** determine the logic that directs how a workflow proceeds. They evaluate the *status* and *code* outcome of a given step, and if there's a match, it will execute the steps contained within that condition. If the status of a condition is `KO`, the *error handling flow* won't be executed as this would be a *handled error*.
## How to create a Workflow
Although workflows can be created via the API, we strongly recommend using the [Invopop Console](https://console.invopop.com) for an easier set up.
In the **Workflows** section click on **+ Create workflow**. You will see a template selection screen. The first two items are blank workflows for each document type:
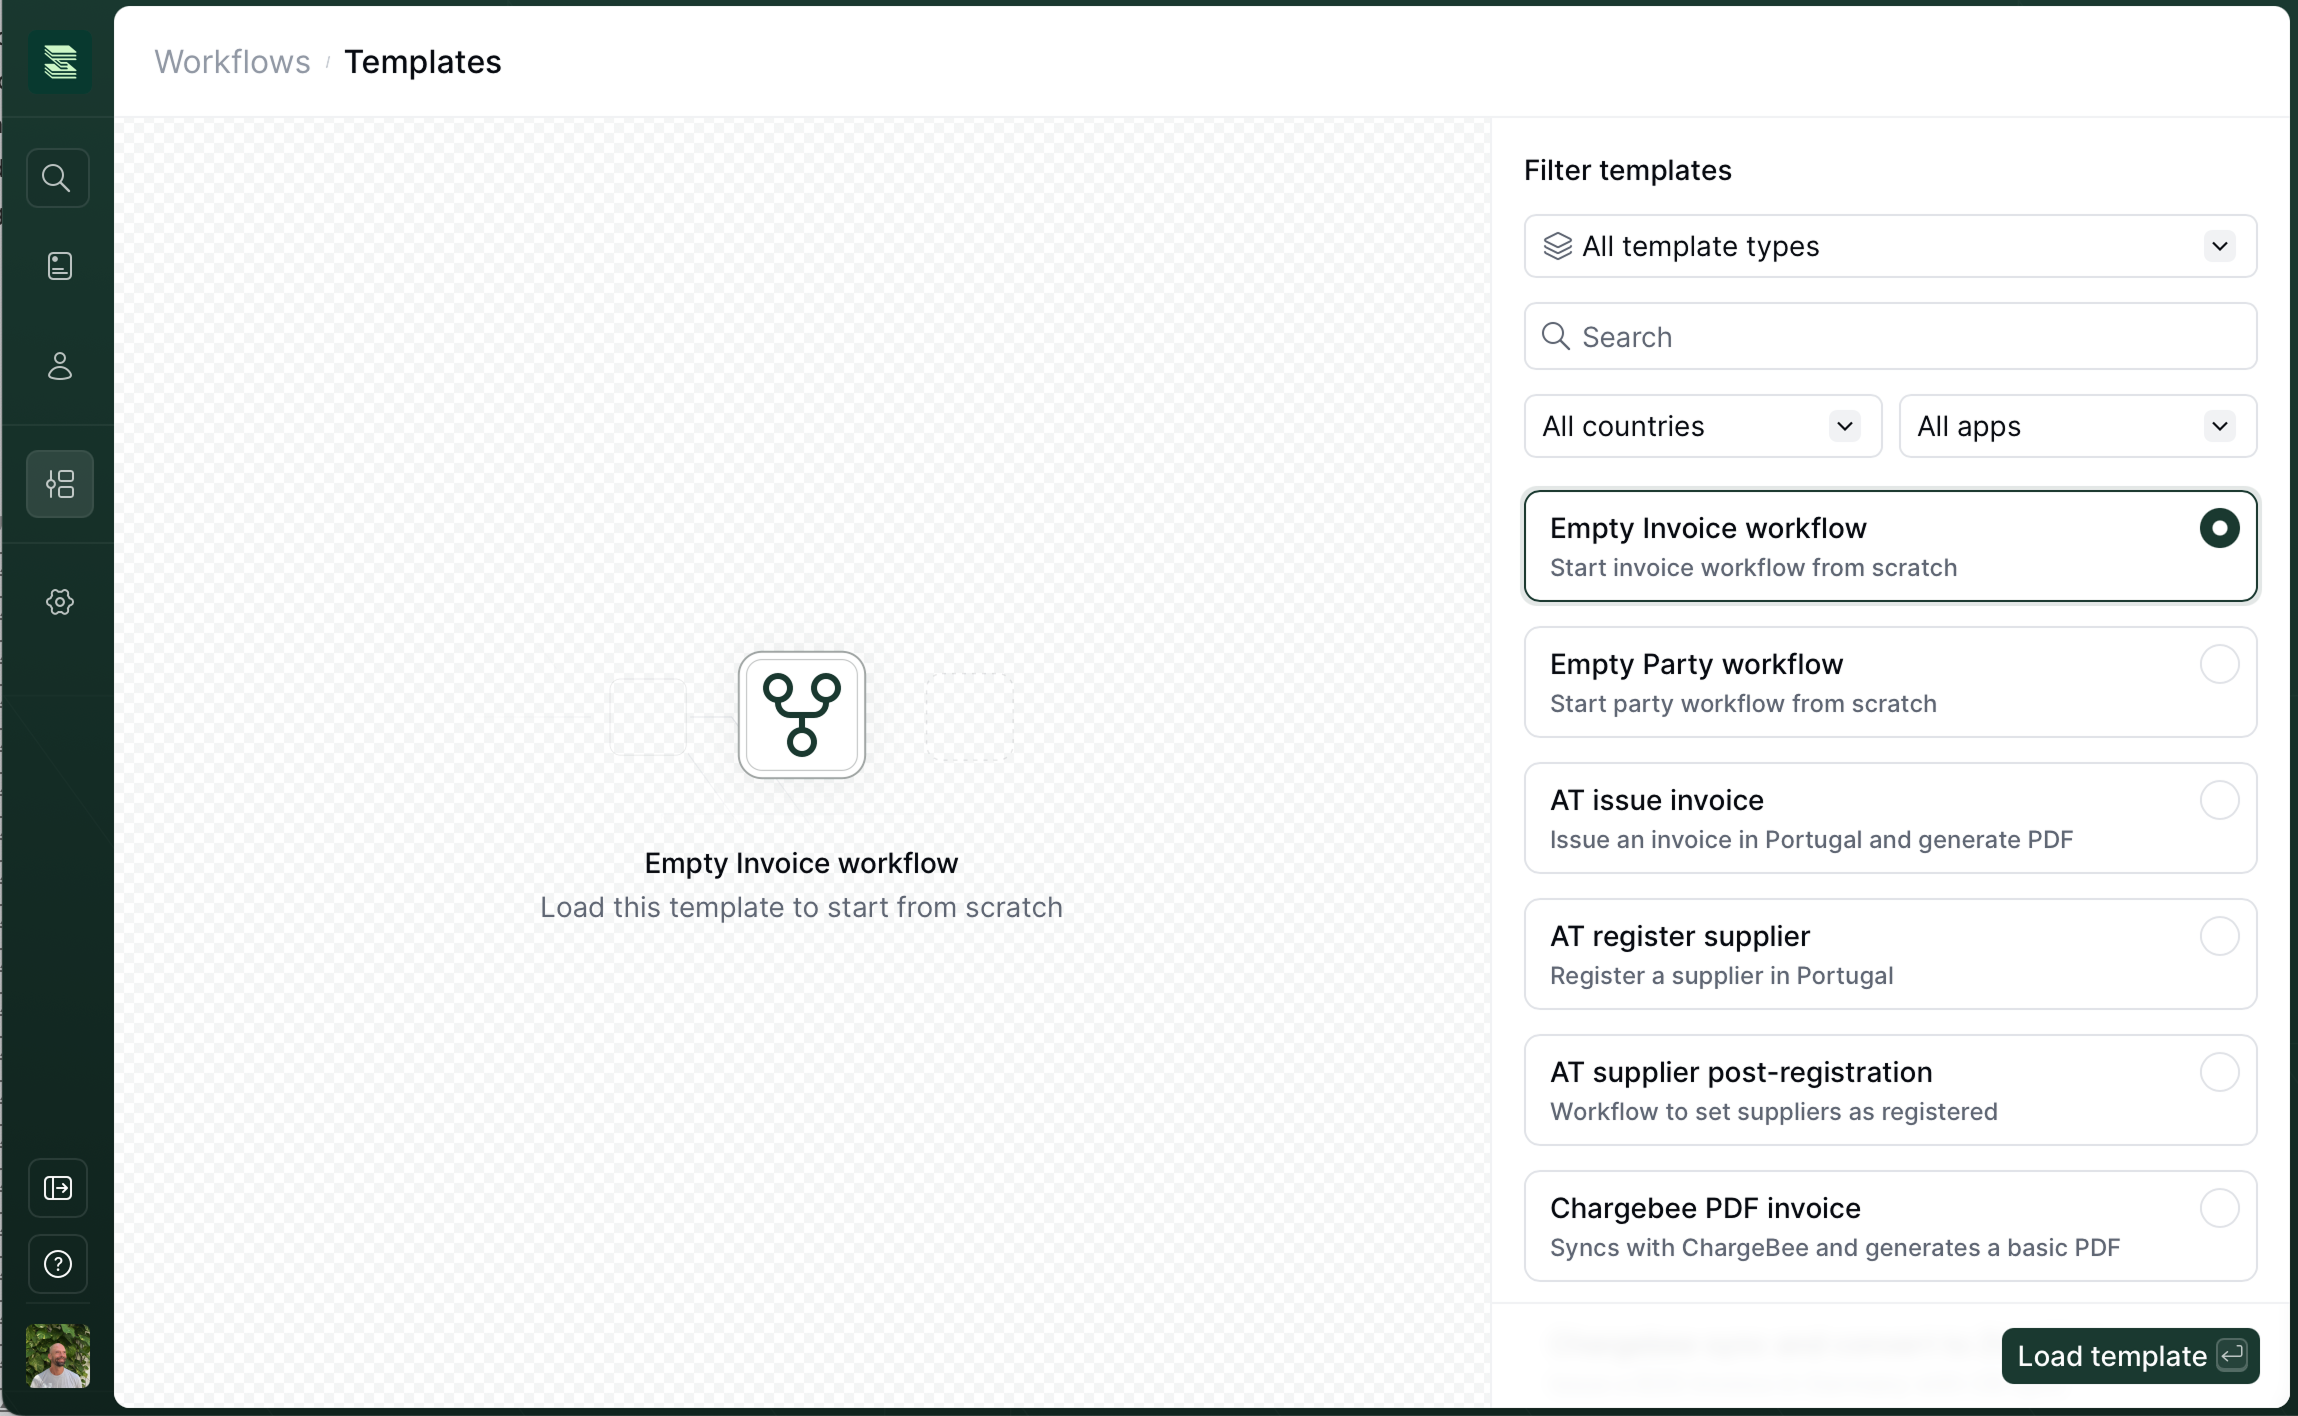 * **Empty Invoice workflow**: for sales or expenses.
* **Empty Party workflow**: for suppliers or customers.
Choose [Empty Invoice workflow](https://console.invopop.com/redirect/workflows/new?template=empty-invoice) for this example and then click **Load Template**.
Give your workflow a name and description by filling the fields on the right sidebar.
Add steps to your new workflow by tapping on the **+ Add step** button and selecting an action from the right. Some steps will require configuration in order to function correctly.
The "developer mode"
* **Empty Invoice workflow**: for sales or expenses.
* **Empty Party workflow**: for suppliers or customers.
Choose [Empty Invoice workflow](https://console.invopop.com/redirect/workflows/new?template=empty-invoice) for this example and then click **Load Template**.
Give your workflow a name and description by filling the fields on the right sidebar.
Add steps to your new workflow by tapping on the **+ Add step** button and selecting an action from the right. Some steps will require configuration in order to function correctly.
The "developer mode"  switch at the top right of the canvas can be used to display the JSON representation of the workflow. This makes it easy to copy and paste workflows from examples or other workspaces. Make sure to return to the visual editor view to ensure the document is validated.
## Creating conditions
Conditions create blocks that execute when a given *status* and *code* (optional) match the response of a workflow step. There are two status signals (`OK` and `KO`) plus `Any`, which matches regardless of the status.
* **OK**: when a workflow step completes as expected.
* **KO**: when there was an error in the step's execution.
* **Any**: will match both `OK` and `KO`.
Codes are generally text or numbers returned by providers. Only some steps will return codes along with their status signals. For example, the *Send VERI\*FACTU (Spain)* step will return the error code as [specified by the AEAT](https://prewww2.aeat.es/static_files/common/internet/dep/aplicaciones/es/aeat/tikeV1.0/cont/ws/errores.properties) along with the `KO` status signal. Since GOBL already handles many of the validations in tax authorities lists, we recommend only implementing conditions which happen in your workflow with certain regularity and which should be handled automatically.
As an example, we will handle the case where a supplier is not registered in the taxpayer census by the AEAT:
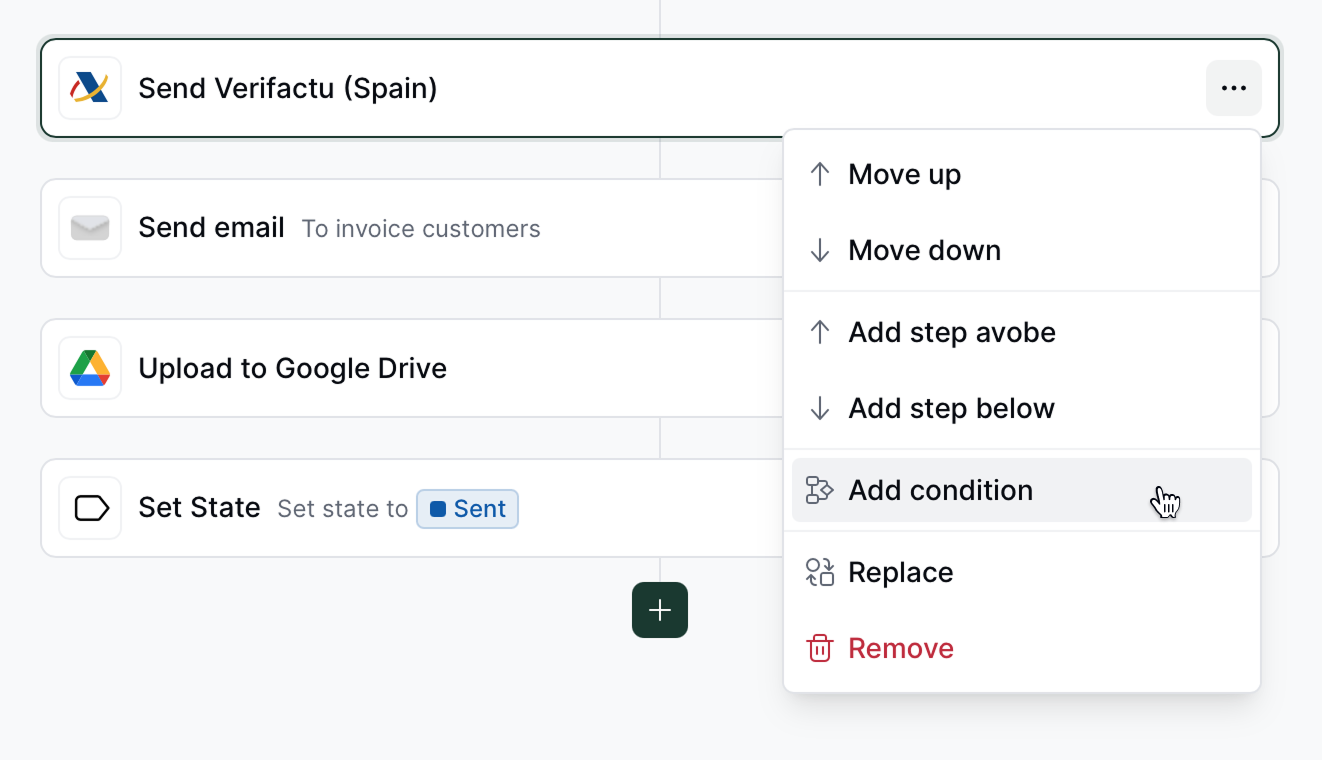
On the desired step, click on the menu button `...` and select **Add condition**.
switch at the top right of the canvas can be used to display the JSON representation of the workflow. This makes it easy to copy and paste workflows from examples or other workspaces. Make sure to return to the visual editor view to ensure the document is validated.
## Creating conditions
Conditions create blocks that execute when a given *status* and *code* (optional) match the response of a workflow step. There are two status signals (`OK` and `KO`) plus `Any`, which matches regardless of the status.
* **OK**: when a workflow step completes as expected.
* **KO**: when there was an error in the step's execution.
* **Any**: will match both `OK` and `KO`.
Codes are generally text or numbers returned by providers. Only some steps will return codes along with their status signals. For example, the *Send VERI\*FACTU (Spain)* step will return the error code as [specified by the AEAT](https://prewww2.aeat.es/static_files/common/internet/dep/aplicaciones/es/aeat/tikeV1.0/cont/ws/errores.properties) along with the `KO` status signal. Since GOBL already handles many of the validations in tax authorities lists, we recommend only implementing conditions which happen in your workflow with certain regularity and which should be handled automatically.
As an example, we will handle the case where a supplier is not registered in the taxpayer census by the AEAT:
On the desired step, click on the menu button `...` and select **Add condition**.
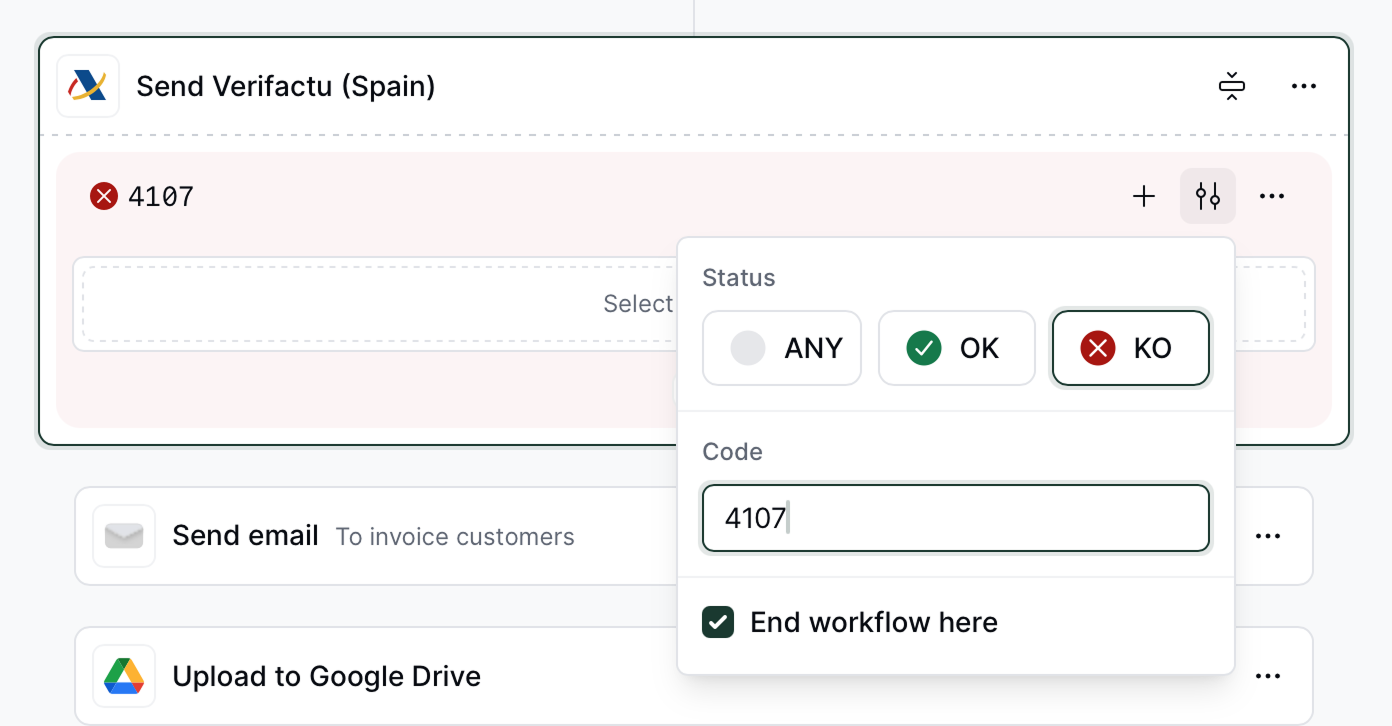 Configure the matching conditions in the popover:
1. **Status**: `KO`.
2. **Code**: `4107` (Tax ID not identified in the taxpayer census).
3. **End workflow here**: `✔` (the workflow will stop executing after this block).
Configure the matching conditions in the popover:
1. **Status**: `KO`.
2. **Code**: `4107` (Tax ID not identified in the taxpayer census).
3. **End workflow here**: `✔` (the workflow will stop executing after this block).
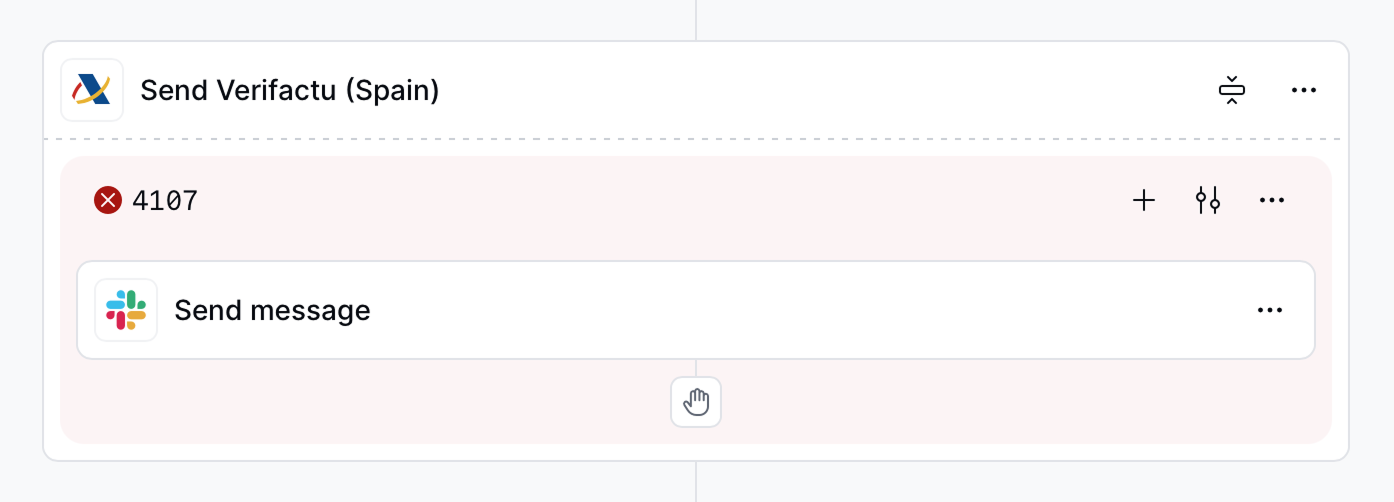 Click on "Select an action" and handle the condition as you wish. In this case, we are choosing to send a Slack message (e.g. for manual intervention).
## Running a Workflow
Workflows in Invopop can be executed through the following methods:
* Manually via the Invopop Console
* Via API calls to the [create job endpoint](/api-ref/transform/jobs/create-a-job-put)
* Automatically by an embedded application.
Workflows are executed on *silo entries* (such as invoices or suppliers), this action creates a *job*. When a job is run, the silo entry will be updated with any changes or attachments generated during processing. The status of a job can be seen in the silo entry's activity tab, or in the **Workflows** → **History** section accessible from the left sidebar.
## Error Handling
Any step that causes an error (`KO`) from which the job can't recover, and is not handled through a condition, will trigger the error handling flow. To enable this section, tap on **Handle Errors** at the bottom of the workflow creation screen, then add steps into this area which you want to execute when the job fails (often times setting the entry's state to `Error` and possibly sending a notification).
## FAQ
If your step conditions displays a **This step contains deprecated conditions** warning, your workflow will continue working normally, but we recommend updating your workflow so that you can modify it without unexpected behavior.
Steps under deprecated conditions will display with a warning symbol ⚠️ with the label "Go to \[action name]". Click on the menu button `...` and select "Replace", and then select the replacement action from the sidebar. So, for example, if the deprecated step is labelled "Go to Set State", replace this step with "Set State" and choose the same configuration as the original step (which you should find further down within the same workflow).
Once all deprecated steps are replaced, locate the the referenced action(s) and delete.
Click on "Select an action" and handle the condition as you wish. In this case, we are choosing to send a Slack message (e.g. for manual intervention).
## Running a Workflow
Workflows in Invopop can be executed through the following methods:
* Manually via the Invopop Console
* Via API calls to the [create job endpoint](/api-ref/transform/jobs/create-a-job-put)
* Automatically by an embedded application.
Workflows are executed on *silo entries* (such as invoices or suppliers), this action creates a *job*. When a job is run, the silo entry will be updated with any changes or attachments generated during processing. The status of a job can be seen in the silo entry's activity tab, or in the **Workflows** → **History** section accessible from the left sidebar.
## Error Handling
Any step that causes an error (`KO`) from which the job can't recover, and is not handled through a condition, will trigger the error handling flow. To enable this section, tap on **Handle Errors** at the bottom of the workflow creation screen, then add steps into this area which you want to execute when the job fails (often times setting the entry's state to `Error` and possibly sending a notification).
## FAQ
If your step conditions displays a **This step contains deprecated conditions** warning, your workflow will continue working normally, but we recommend updating your workflow so that you can modify it without unexpected behavior.
Steps under deprecated conditions will display with a warning symbol ⚠️ with the label "Go to \[action name]". Click on the menu button `...` and select "Replace", and then select the replacement action from the sidebar. So, for example, if the deprecated step is labelled "Go to Set State", replace this step with "Set State" and choose the same configuration as the original step (which you should find further down within the same workflow).
Once all deprecated steps are replaced, locate the the referenced action(s) and delete.